Creating a Voucher with an ENC Purchase Order
Encumbrance (ENC) Purchase Orders are created using "ENC" as the supplier when agencies need to encumber funds, but the recipient is unknown (e.g., grant payments, capital contingency). If the supplier is "ENC," the voucher will need to be created manually to update the supplier information fields to match the supplier information on the invoice.
Steps
- Verify or update the Business Unit field with the buying agency's Business Unit (i.e., the state agency receiving the goods and/or services as reflected on the invoice image).
- Verify or update the Origin Code field with the Origin Code of the agency location or division for which the voucher is being created to route the voucher to the correct FSS participating agency approver.
-
- If the origin code is changed after the ChartField information has been populated, unhide the ChartField string.
-
Verify or edit Pay
Terms.
- The Pay
Terms will default to "Due Now" or to the pay
terms specified on a contract when a Contract Number is referenced.
Correct
usage of supplier Pay Terms
allows OAKS FIN to calculate late interest charges, early payment
discounts, etc., (based on the Invoice
Date).
- Enter Invoice Number based on the "Determining Invoice Number" process.
-
If the Invoice Number field
populates with "Critical," click herehere.
- Agencies will email critical invoices to criticalinvoices@obm.ohio.gov.
After an automatic batch schedule completes in OAKS FIN, these
images will appear on the AP Sorter
and AP VOLT page
and "CRITICAL" will populate the Invoice/Invoice Number field. The critical
invoices will appear in the VOLT Next In Queue and be worked immediately
as they are received.
- Statuses of critical items can be verified as proper system
functionality (ensuring Tumbleweed/Mavro is working properly)
maintained by running the query titles "OH_AP_OSS_SORTER_CRITICAL."
- Critical
invoices sent to Criticalinvoices@obm.ohio.gov will be processed
within one business day provided that at least one of the following
criteria is met:
- Subject
to a loss of discount.
- Late
fees will be added.
- Potential
disconnection of service.
- Time-sensitive
payments (i.e., grants/federal cash draw)
- If
the agency specifies that they are subject to a loss of discount,
late fees, or disconnection of services, use Payment
Terms of "DUE NOW." Place a comment
on the voucher indicating potential loss of discount, potential
late fees, or potential disconnection of service.
- Enterprise Content Management (ECM) will assist in monitoring
the Critical mailbox error folder.
- Items in the error folder that can be processed will be
resubmitted back to the Critical mailbox.
- Communication of items identified as improper submissions
such as invalid format and items that do not contain attachments
will be facilitated by ECM.
- Items out of scope from the above will be escalated to
the service line coaches.
- If the "remit to" address is incorrect or not in
OAKS, Accounts Payable will perform the following steps:
- Create voucher selecting CHK as the location and Return
to Agency (RA) as the payment handling.
- Provide the following case solution: Voucher ID number
and "Warrant was processed as Return to Agency (RA) and
will need to be picked up from state accounting.
- The agency will need to mail the
payment to the correct supplier invoice address.
- Email image to Supplier Operations informing them of the
"remit to" address issue.
- Supplier Operations will contact
the supplier to update address in OAKS.
- Enter the Invoice Date based on the "Determining Invoice Date" process.
- Future Dated Invoices can be processed if the date is within three business days of the current date if the invoice date is greater than three business days from the current date, see "Working a Exception Code 10: Future Dated Invoice."
-
- Acceptable payments that can be made prior to receiving the goods or service includeinclude:
- airline tickets,
- travel when booked through a travel agent (including agent fees),
- tuition/registration Fees,
- witness fees, when necessary,
- subscriptions,
- software licence renewals, and
- real estate, rent, and leases.
- If a determination is made that the goods were received (e.g., service dates or deliver dates), the voucher can be created using the Sorter Date.
- Enter the Invoice Received Date based on the "Determining Invoice Date" process.
- Enter the date on which the goods or services were received in the Last Receipt Date field.
- Enter the Invoice Total as it appears on the invoice image in the Invoice Amount field.
-
FSS is to voucher the payment for JFS UC Tax Contribution Section Unemployment invoices only from the "Additions to Balance" unless the backup documentation for past due balances is submitted or attached.
-
Enter any additional information provided on the invoice.
-
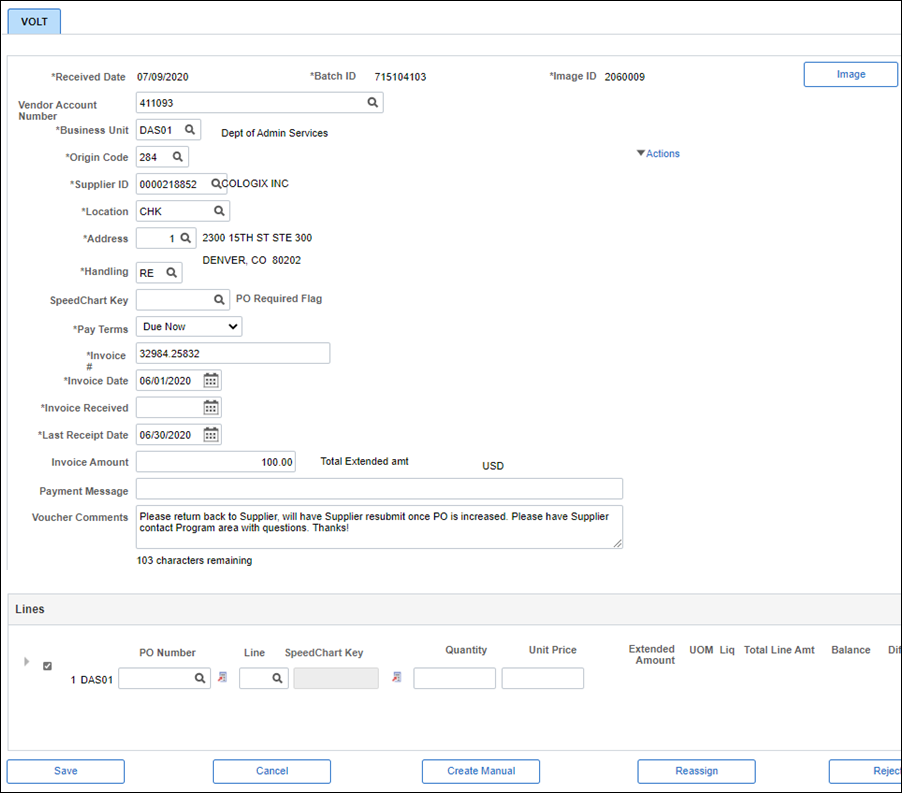
Click Create Manual.
- The Manual Entry page displays.

- Select the Reason Code lookup icon and select "ENC Purchase Order."
- Click OK.
- The Voucher page displays with the values from the AP VOLT page populated.
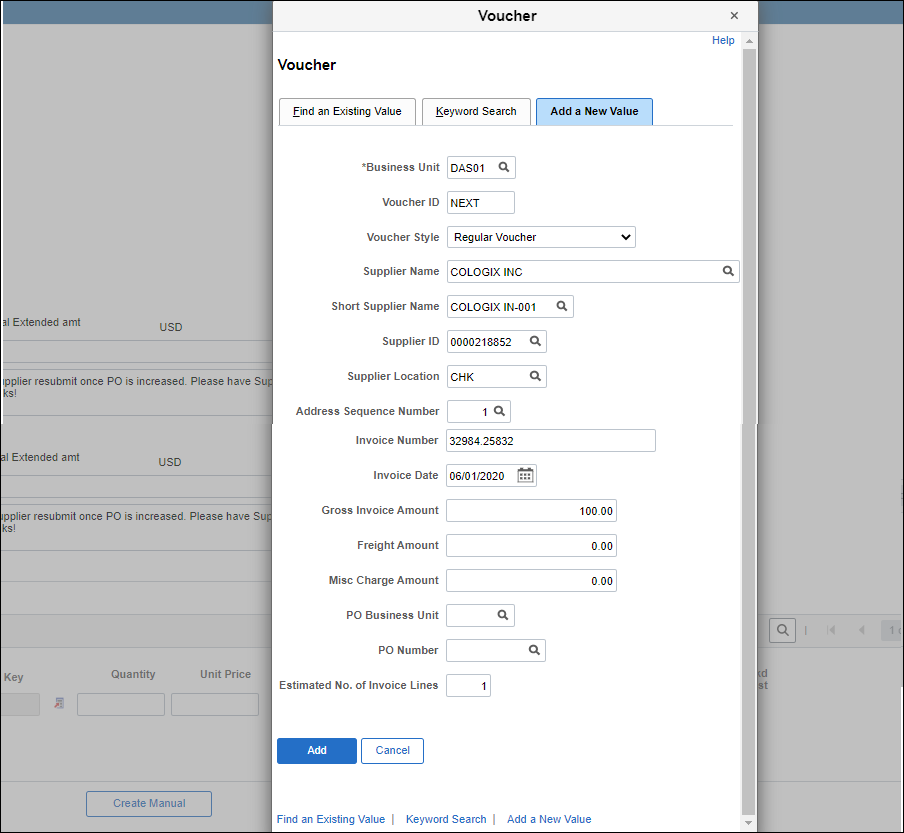
Updating the Add a New Value Tab
- Do NOT change the Voucher ID.
- The Voucher ID defaults to "NEXT." OAKS FIN will automatically assign the next available voucher ID code.
- Do NOT change the Voucher Style.
- The Voucher Style defaults to "Regular Voucher."
- Clear the GrFSS Invoice Amount field.
- Click Add button.
- The Invoice Information page displays with the invoice details previously entered on the Add a New Value tab.
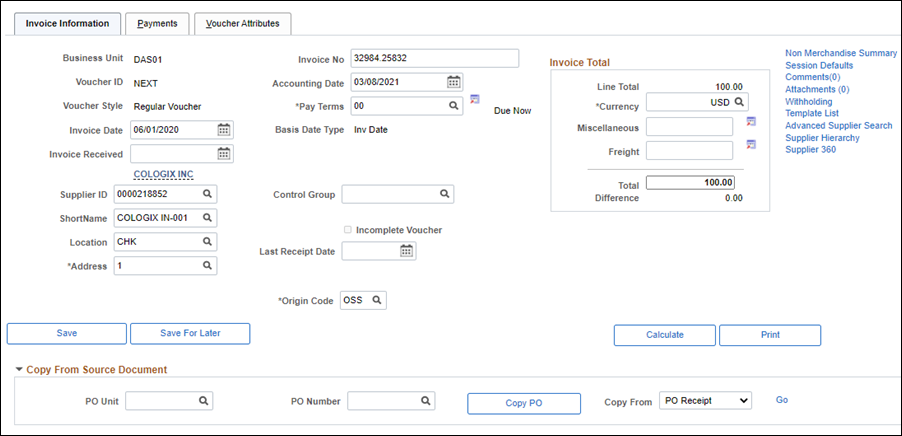
Update the Invoice Information Tab
- Enter the Invoice Received Date based on the "Determining Invoice Date" process.
- Enter the date on which the goods or services were received in the field.
-
Expand the Copy From Source Document section to search for a "Purchase Order Receipt" to confirm the existence of a valid receipt.
-
"Purchase Order Receipts" should be used if a valid receipt was created by the agency. However, the entire receipt (all receiver lines) must match the invoice total exactly (excluding shipping costs). If the receipt does not match the invoice, create the voucher using only the Purchase Order and enter a voucher comment explaining why the receipt was not used via the Comments link.
-
Review PO/Receipt Comments to obtain additional agency instructions.
- Select "PO Receipt" from the Copy From dropdown list.
- Click Go.
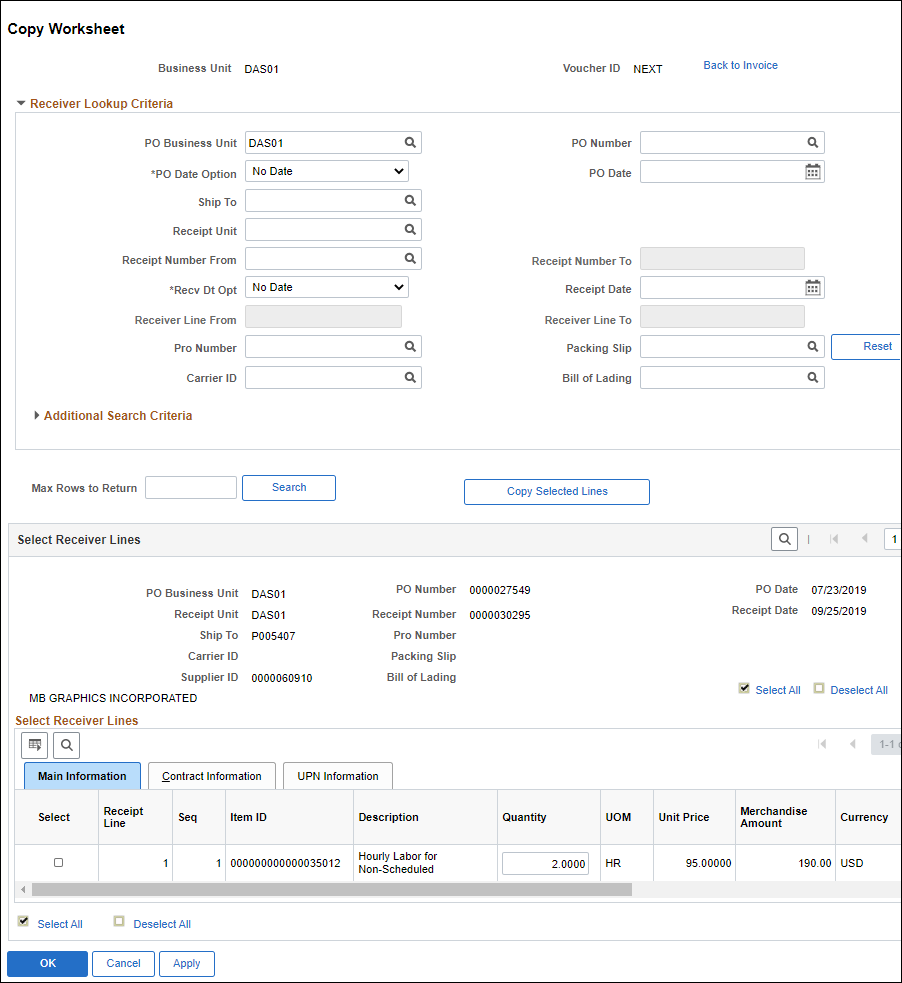
- The Copy Worksheet page displays the Receiver Lookup Criteria.
-
- Update PO Business Unit with the Business Unit of the agency who created the purchase order.
- Update PO Number with the purchase order number.
- If a Receipt Number is provided on the invoice or the FSS Standard Invoice Pre-Processing Form (PPF):
- Enter the Business Unit in the Receipt Unit field.
- Enter the Receipt Number in the Receipt Number From field.
- Click Search.
- All receipts available for use affiliated with the specified purchase order displays.
- If a valid, matching receipt is not available, click OK. Close this procedure window and enter a voucher comment explaining why the receipt was not used via the Comments link.
- If a valid, matching receipt is available, click View All to display all Receiver Lines (i.e., Receipts).
- Click the Select checkbox to the left of each applicable Receiver Line (i.e., Receipt Line) to copy to the voucher.
- The entire receipt (all Receiver Lines) must match the invoice total exactly (excluding shipping).
- All Receiver Lines must be used.
- Click Copy Selected Lines.
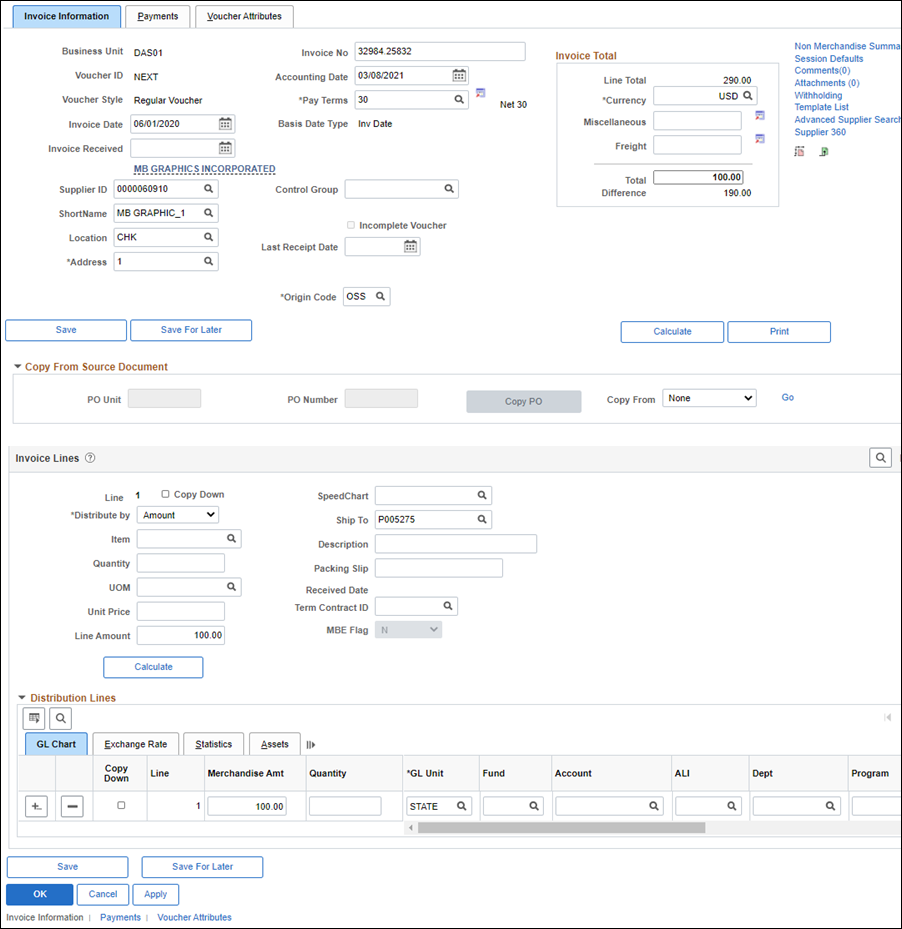
- The voucher line and distribution line details on the Invoice Information tab update based on the receipt lines selected and cannot be modified.
- Continue to update the remaining invoice details.
- If no PO Receipt is found, click Back to Invoice.
- If the agency did not create a receipt that matches the invoice, create the voucher using only the Purchase Ordercreate the voucher using only the Purchase Order.
- Select "Purchase Order Only" from the Copy From dropdown list.
- Click Go.
- The Copy Worksheet page displays. Use the Copy Worksheet page to specify the PO number and copy the appropriate purchase order lines into the voucher.
- Enter the PO Business Unit.
- Enter the purchase order number in the PO Number From field.
- Click Search to view the purchase order lines.
- The available PO Lines display.
- If the purchase order provided on the invoice or PPF is invalid (PO No. field with a red background).
- If a purchase order does exist, but will not cover the full payment, refer to "Working an Exception Code 09: Insufficient PO Funds."
- Do not research or search for another PO when creating a voucher.
- Exception: If the PO on the Invoice or Standard Pre-Processing Form (PPF) is missing 1 or 2 digits and the processor can determine the correct PO, use the correct PO and add a comment on the voucher. Do not use the PO if it is exhausted, invalid, not dispatched or if there is a PO/supplier mismatch.
- Click Select checkbox to the left of each PO line that should be copied into the voucher.
- Review the UOM field on the Main Information tab to determine if the purchase order is distributed by Amount or Quantity (e.g., HR, EA, or QTY).
- If the UOM is "AMT" - update the Merchandise Amount field with the invoice total.
- When the purchase order is amount-based, do not change the Quantity field on the Invoice Information page (leave the default of "1").
- When encumbered by amount, the voucher will match by price, thus the remaining dollar amount will be available to voucher.
- The tolerance level for how much can be referenced on a PO vs. the remaining dollar amount available is defined at the Item ID level or Business Unit level. The general standard is a 10%tolerance.
- If the UOM is Quantity (e.g., HR, EA, or QTY) - update the Quantity Vouchered field to reflect the quantity on the supplier invoice.
- When the purchase order is quantity-based, do not change the Unit Price field .
- APO setup by quantity will be liquidated by quantity; therefore, the quantities being vouchered must be calculated.
- If the lines on the PO matched to the voucher are by quantity, a debit line cannot be added to the voucher by amount (it must also be quantity).
- Click Copy Selected Lines.
- The invoice and distribution line details on the Invoice Information tab update based on the PO line(s) selected.
- Add additional invoice lines (if needed).
-
- Purchase Order references are not required on additional invoice lines.
- More than one Purchase Order can be referenced on a voucher. If necessary, one Purchase Order can be quantity-based and the other Purchase Order can be amount-based.
- Validate the Account Code in the Account field.
- The appropriate Account must be used. An Account Code is acceptable if the description of the account code closely relates to the goods or services received.
-
When using a capital expense Account Code 57xxxx, the Project ChartField is required.
-
If partial coding or an invalid ChartField string is provided refer to "Working an Exception Code 96: Invalid Menu/Coding."
-
Refer to the OAKS FIN Account Code Reference.
- Enter the Total (Invoice Total) as it appears on the invoice image.
-
When creating vouchers with the EFT payment method, do not enter a single voucher exceeding $99,999,999.99 (the payment must be split into separate payments). If processing the voucher to pay via warrant (CHK), the total may exceed the $99,999,999.99 ceiling.
-
Enter the Total with the lesser of "current charges" or "balance due" as it appears on the invoice image.
-
The amount entered should exclude "sales tax" listed on the invoice image when the supplier's "remit to" is in Ohio or when OHIO sales tax is explicitly stated (other taxes such as county tax, bed tax, or federal tax should be included).
-
Sales tax should be included if reimbursing a direct bill that was previously paid by an individual.
-
The amount entered should exclude past due charges.
-
The amount entered should exclude late payment fees (unless the supplier and service is a utility regulated by the Public Utilities Commission [PUCO]).
-
FSS is to voucher the payment for JFS UC Tax Contribution Section Unemployment invoices only from the "Additions to Balance" unless the backup documentation for past due balances is submitted or attached.
- Click Calculate to validate the line amount matches the sum of the distribution amount.
- Confirm that the Difference (the difference between the sum of the Distribution Lines and Invoice Total) displayed is 0.00.
- If there are multiple distribution lines:
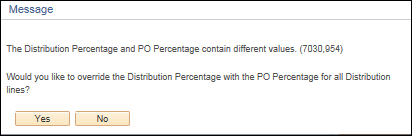
- Click Adjust PO Percentage.
- A messagemessage displays stating that the PO Percentage contains different values.
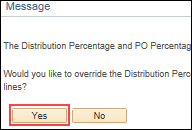
-
Click YesYes to adjust the percent values on the page.
- The percent fields are now editable and the values are reset to the same as PO Percent values.
- Click Allocate by Percentage.
- The Merchandise Amt and Quantity are adjusted to the correct percentage as the PO Percentage.
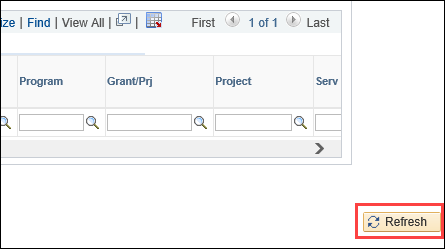
- Once the Invoice Lines section has been updated, click the RefreshRefresh button on the Invoice Information Section.
- Any fields that contain invalid data will display with a red background and must be corrected.
- Click View/Edit Source link to view the PO/Receipt Comments.
-
Click PO/Receipt Comments.
-
Review the Comments and make the necessary updates as applicable to the voucher.
-
Edit supplier MBE or EDGE status as on the Invoice Information tab applicable to the pre-processing or PO comments, If MBE/EDGE field is grayed out (cannot be changed), enter a voucher comment and FSS Comment indicating correct MBE/EDGE status cannot be flagged as OAKS field is locked. See the "Reviewing/Updating the Invoice Lines" section for more details.
-
Click OK.
- Verify MBE Flag field with "E," "M," or "N" based on the FSS Standard Invoice Pre-Processing Form.
- Edit MBE Flag as applicable to the pre-processing or PO comments, if MBE/EDGE field is grayed out (cannot be changed), and enter a voucher comment via the Comments link indicating correct MBE/EDGE status cannot be flagged as OAKS field is locked.
- Select the Pay TermFSSically displays the supplier's preferred payment terms, based on the supplier record).
- Update the Origin CoFSSith the Origin Code of the agency location or division for which the voucher is being created to route the voucher to the correct FSS participating agency approver.
- If the origin code is changed after the ChartField information has been populated, unhide the ChartField string.
-
Click Comments link to enter necessary commentsnecessary comments.
- The amount on the receipt does not match the amount on the invoice.
- OAKS rounding issues.
- State Accounting authority to deviate up to $2.00 based on OAKS rounding issues.
- If account code(s) can not be debited, pay closest to invoice amount.
- If account code(s) can be debited, debit code the remaining balance of the invoice.
- CRM Cases (Include CRM Case number).
- Reversal/Corrective Vouchers.
- Once the Reversal Voucher has been completed,enter the original voucher number on the Corrective Voucher.
- Enter Corrective Voucher number on the original voucher.
- Stop Payments/Warrant Cancellations.
- MBE/EDGEMBE/EDGE field is grayed out and cannot be changed.
- Edit MBE Flag as applicable to the pre-processing or PO comments, if MBE/EDGE field is grayed out (cannot be changed), enter a voucher comment via the Comments link indicating correct MBE/EDGE status cannot be flagged as OAKS FIN field is locked.
- If the voucher will complete the three-way match, then comments are not required; because the voucher will bypass the agency approval process.
-
Click Attachments link if you need to add supporting documentation to the voucher.
-
Click the Payments tab.
PO Voucher - Payments Tab
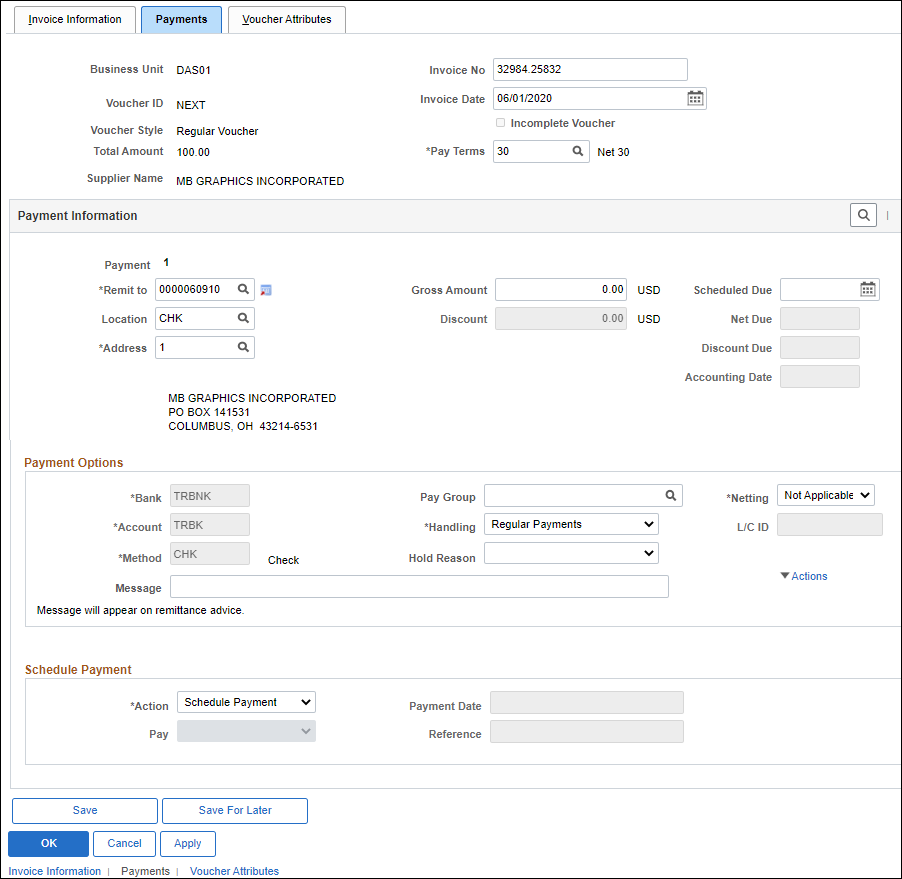
The Payments tab displays with the invoice details previously entered on the Invoice Information tab. Continue entering additional supplier and/or payment information using the steps below.
Remember, when creating vouchers from Purchase Orders (POs), the supplier information is automatically populated with the data from the purchase order.
Entering Supplier Information
- The supplier information (i.e., Pay Terms, Remit To, Location, and Address) entered on the Invoice Information tab automatically populates the Payments tab. Accept the default and continue processing unless the invoice falls into the exception listed below.
- Location and Address (Payment "Remit To" Address Difference)
- If the invoice image and FSS Standard Invoice Pre-Processing Form lists a different “remit to” address for the supplier, use the remit to address as indicated on the invoice, not the FSS Standard Invoice Pre-Processing Form (PPF). This form is designed to allow agencies to submit any agency-desired processing information in addition to the invoice. However, the invoice should be used as the primary document to follow. Search for the correct "remit to" address using the search icon in the Location or Address field. EXPANDEXPAND.
- If the payment type is "CHK," the address selected must be an exact match to the supplier's "remit to" address as it appears on the invoice image.
- If the payment type is "EFT," the address selected must match the "remit to" street address (excluding acceptable variations of the suite, building, room number,etc.) on the invoice image.
- Select the correct Supplier Location (supplier payment method) using the Look up Supplier Location icon that corresponds to the Address Sequence Number selected. The Supplier Location and the Address Sequence Number must always match if payment is to be made by EFT, (e.g., select "EFT-2" if Address Sequence Number "2" is selected). If EFT does not have a corresponding address, use CHK and add Comments.
- If "MAIN" is the only location available, contact Supplier Operations to fix.
- EFT is the default payment type when available. The agency or supplier may redirect the payment type.
- If invoice has PO Box AND address, neither are labeled as remit AND both are in OAKS AND there is no EFT - use PO Box (i.e., if the EFT is setup to match the physical address = use physical address).
- Zip code information (only the first 5 digits) must match between the invoice and the supplier record in OAKS FIN to continue the voucher process.
- If there is a discrepancy in the zip code between the invoice and OAKS information, follow the steps below:
- Verify the zip code in USPS. If information in OAKS matches with information in USPS, the invoice can be processed.
- If OAKS information requires updating, reach out to Supplier Operations. Once the update has been made in OAKS and it now matches what's in USPS and/or invoice, the invoice can be processed.
- If the supplier's "remit to" address on the invoice image appears to not be in OAKS FIN, refer to the "Working an Exception Code 07: Remit to Address not in OAKS" process.
- Remit To (Payment Supplier Difference)
- If processing a Loan Repayment invoice for physicians or attorneys,the supplier used on the Invoice Information tab is different than the supplier used on the Payments tab. EXPANDEXPAND F
SS
- The Invoice Information tab uses the Supplier ID for the attorney or physician (e.g., Contractor (clinician)Name) listed on the invoice.
- The loan Lender/Servicer must be entered on the Payments tab by editing the Remit To field.
- The Payments tab will automatically populate with the information entered on the Invoice Information tab. The loan servicing center’s (Lender/Servicer) Supplier ID must be used. To change the payment vendor, edit the Remit To field by entering the appropriate Supplier ID for the lender/servicer.
- To ensure correct application of payment, enter Message indicating “Payment to be credited to the principal for (Contractor/Clinician name and account number).”
Entering Payment Information
- Update the Handling field if instructed by the FSS Standard Invoice Pre-Processing Form (PPF).
-
Add a payment message.
-
There are two methods for entering Payment Messages: manually (using the free-form Message field) or selecting an agency-specific pre-defined message (using the Messages hyperlink). Both messages will display on the warrant (CHK) stub (up to 70-characters), but free-form Messages will not display on EFT.
-
-
If a payment message is provided on the FSS Standard Invoice Pre-Processing Form, enter the message in the free-form Message field (up to 56 characters).
-
Click the Messages link to add the standard OBM Financial Support Services payment message to appear on warrant (CHK) remittances.
-
Before saving, double-check all fields.
- Click Save or Save For LaterSave For Later.
- The Save for Later function allows users to save vouchers that are in progress, but not completed; users can come back later to complete the voucher.
- The following details are required in order to use the Save for Later functionality:
- Supplier Information
- Invoice Date
- Last Receipt Date
- Account Code
- After a voucher is saved for later, a voucher number will be created, but no voucher balance or combo edit checks will be performed. OAKS FIN automatically assigns the next sequential number in the Voucher ID field.
- A status of Incomplete (“I”) will be displayed and the voucher will not be routed for approval. Instead, it will go into a recycled status and be displayed in the Voucher Processor's Work Center.
- Another Voucher Processor with the same security may complete the pending voucher.
-
- OAKS FIN assigns the next sequential Voucher ID number to the voucher.
- OAKS FIN automatically checks for duplicate invoices when a voucher is saved in OAKS FIN based on the following field combinations: Business Unit, Invoice Number, Supplier ID, and Amount. If the "Duplicate invoice detected" message appears, refer to the "Working an Exception Code 04: Duplicate Invoice" process.
-
Message not found error means that a voucher is flagged as RA (see handling field), but EFT was chosen as the location. If a warrant is sent via electronic funds transfer, it cannot be returned to the agency as requested. To clear the error, click OK then change the location to CHK (check).
-
The Print button allows the agency to print a voucher.